Thursday, April 26, 2012

Farewell to the Atlas Forum


With the announcement that Atlas Model Railroad Co. will be shutting down its widely popular internet forums, I can't help but reflect on what an impact that particular discussion group had on my participation in the hobby.

The first project I posted on the Atlas Forum at any length about was the Chaffee Branch, which was supposed to become a part of my final layout design.  The forum challenged me to build better models, take better photos, and put a lot more thought into what I was doing.


As work on renovating the train room commenced, I switched my focus to the "Temporary Rig" layout, a simple 3' x 8' test bed that kept me entertained for a couple of years.  Looking back at that work, I can see how much my work needed improving.


Concurrent with that, I began constructing the Maryland Junction section of what would become the current permanent layout out in the garage.

After boring you all to tears with the glacial progress, I finally had the train room done, and was ready to move the work upstairs...


Gradually, from this chunk of foam and lumber, the layout grew into a functional model railroad, although a lot of it was still temporary construction, due to the fact that my son shared the room with me for a few years...


Note the twin bed and the tasteful Ravens banner over the yard lead...

Still, it was fun to have a few guys over to run trains and drink beer, most of whom were encountered here on the Atlas board.


Ultimately, the boy moved into other quarters, allowing me to finally build out the footprint that I had designed almost 7 years earlier...a task which has kept me occupied for almost three years now.


Along the way, I got to share the experience with some truly gifted modelers, and some genuinely awesome people.  Many of whom I'm proud to call friends...

with Randy Gustafson (Randgust) and Brian Carhart (RockGP40).

with Dr. Dave Vollmer

with Bernie Kempinski

with Max Magliaro and Jerry Britton

with David K. Smith, Dave Foxx, Phil Hoffman (KCSphil) and Tim Alder (sizemore).
with Dave Vollmer, Eric White (eric220), Ed Kapuscinski, Bob Bufkin, and Carl Tweedale...
I could go on...

The friendships I've developed starting from the Atlas board and on to the other lists I hang around on, have been extremely valuable to me both as a model railroader, as well as personally.

There have been some mighty good seeds sewn in the fertile soil Atlas provided. I think we'll see the quality of work, both by the manufacturers and by us, continue to improve and increase thanks to the community that was fostered on the A-Board.

 Atlas spawned most of the other on-line groups by being so open to the discussion of so many things.  The very notion that we could critique any manufacturer's goods, including their own, with such abandon was astounding.

For a long time, before we all started to migrate to our own modeling strata, Atlas was the go-to place for straight talk about the hits and misses of pretty much every product imaginable. 

Would Atlas be doing add on parts and lower ride heights without the forum?  Would ESM, Fox Valley or Exactrail be hitting the markets they're now hitting without the threads on Atlas that pushed the envelope?

While it's true we had our Skip, Fran AND Fun on Atlas, we also had Max Magliaro and Randy Gustafson, both of whom are outstanding modelers and problem solvers.  It will be interesting to see how the groupings work out as people look for other opportunities to share genuinely useful information and techniques.

I haven't spent much time on there in the last year or so, but there's no way I'd be doing the level of work I try to do now were it not for the Atlas Forum.  Godspeed, and I hope to see some of you out there in the ether somewhere.


Tuesday, April 10, 2012

Rome Revisited

Back in November I posted about the long journey that has been subjected to my model of the Cumberland, Maryland WM depot, which had languished for more than half a decade while I sputtered along doing other things.

Well, I'm happy to report, it's getting very near completion.  If you've been following along at home on the Railwire, or any of the other on-line street corners I hang out on, I apologize for the repetition.  But here's a brief history of the project.

First off, in 2000, I traded in all my dreams of a 1970s era Conrail layout for an Atlas Western Maryland SD35.  As validation of that decision, in January of that year, Model Railroader Magazine published plans for the WM's Cumberland depot, and in N scale, no less.  Immediately I began doodling a track plan that would require the services of this venerable old stack of bricks.

In 2003, I bravely filled a cart with brick sheet from Plastruct, and photocopied the plans several times to create cutting templates.  I busily scribed and snapped out dozens of window openings, then brick pilasters, and finally, glued together a stack of Evergreen Styrene strip to piece together the distinctive cornices of the building.  In addition to the MR drawings, I had a couple of old photos I had taken while in The Queen City back in 1989.  A few evenings and several #11 blades later, I had come up with this:


I had the exterior walls assembled, built a dormer and a chimney, and even the nifty vestibule from the waiting room to the platform.  I shot it all with a color that I thought was pretty good, then put it all aside to work on other projects on the layout.

Long story short, I went to retrieve it from the storage box I'd put it in, since I was now getting to the point where I was going to be ready to install the station on the layout.  As discussed in November, the windows were a big hang up.  After a couple of conversations on-line, and couple of files sent back and forth via email, the problem was solved by Rob Madson (a.k.a Lord Zox on the 'wire) who was just then tinkering with a Silhouette SD digital cutter.  He created beautiful windows from cover stock, in full color, no less, and self-adhesive!  It was a brilliantly simple solution to a problem that had dogged me for years.


I quickly had the exterior walls finished with the windows, then turned my attention to installing some interiors and LED lighting, which ended up taking a couple of weeks.  The interiors ended up being pretty elaborate, made necessary by the large windows.  The station would occupy a prominent location, highly visible from the aisle, so all that glass demanded to be fed with interior details.  Using some scrap styrene vertical window blinds, I whipped up a series of partitions based on the floor plans from the MR drawings, aided by a digital copy of the building's original blueprints.


In addition to wanting to show off something through the windows, I needed to repair some pretty serious warpage that had taken place while in storage.  The full wall to wall floors helped pull the walls back under control.  With the interior partitions situated, I made with the soldering pencil, and started adding lighting.

While I'll never win any awards for neatness, I was pretty happy with the results.  By poking the LEDs for the first floor through the ceiling, I had the anodes and cathodes sticking up far enough above the second floor ceiling that all the wiring could be confined in the attc, keeping that colorful rat's nest out of the view shed of the interior.  When I had it all rigged up, I dimmed the lights to see what I had...
At this point, I felt like I was on to something.  Gradually I added the last few major details, including the roof...
And the platform:
Then I got stuck again.  Dormers.  There are a dozen dormers on the roof of this thing.  Years ago, recall that I had build up a dormer, well, the face of the dormer anyway, and then set it aside.  It wasn't a bad little dormer, in fact, it looked mighty good!  But the idea of building a dozen of them from scratch was indeed a daunting consideration.
There are no fewer than 25 separate pieces used to construct this dormer.  Scratching them all out was out of the question.

Resin casting seemed like a logical thing to try.  I had bought a resin casting kit some years ago in anticipation of this very project.  But alas, time had taken its toll on the kit, and all of the resins and mold making material had long since turned to rock.  Once again, one of my colleagues on the Railwire, David K. Smith, provided the solution.  I sent the master dormer I had built up to NZT Products' world headquarters, and a few days later, I received a package in the mail that contained 12 perfectly identical dormers, sloped at just the right angle to give the roof its signature appearance.

 Now I was in the home stretch.  I painted up the dormers, finished the chimneys, and built up the shed roof over the platform, and finalized the installation of the interior exterior lighting..
Finally, I positioned it on the layout, and popped a couple of pictures.
Now I'm freed up to work on the details around the station, including the dramatic flood control channel of Wills Creek directly in front of the station.

So anyway, I'm happy to report to you that I've finally finished a project!

Monday, April 9, 2012

Living in the Modular Age...

So I picked up some of Walthers' N scale modular bits and pieces that were being clearanced out at $2.99 a pack.  These have been out for a while, so I'm sure more accomplished modelers than I have already commented on these kits, but having recently completed a structure using them, I feel the need to publish a couple of observations.

First, I should clarify that over the years that I've built a number of structures using Design Preservation Models' modular wall system, and despite the limited variety that's offered, I've had a lot of fun working with it.  Here's a couple of modest examples:
The commissary at the west end of Ridgeley Yard


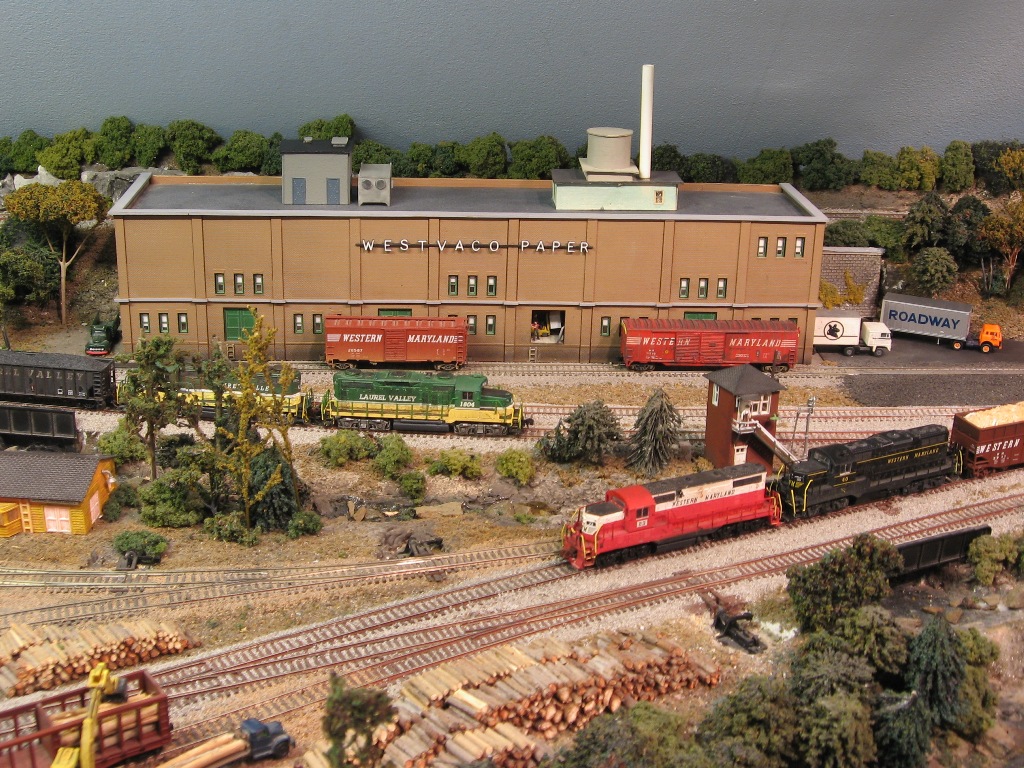
The Westvaco Paper Warehouse at Luke

The Department of Public Works at Ridgeley


Hudson Motors Assembly Plant office, Delmarva Model Railroad Club

...among others.

Generally, the parts need a little work to put them together, but they're certainly "vanilla" enough be adapted into a variety of situations.

I think the size of the panels, the brick pilasters used to join them, and the variety of window/door arrangements are at the very least adequate.  The main feature I've come to appreciate, though, is the spacing of the loading dock doors.  Run in a simple alternating pattern, you can line up 40' boxcars and align them to the loading doors without uncoupling the cars.

So let's take a look at the Walthers' Modular system.
Again, there's a reasonable variety of doors and windows, but I can't help but wonder if they didn't design these things to be used by HO modelers.  The windows are modeled as double hung (top and bottom sashes that slide up and down in tracks along the side) but they're enormous.  The doorway openings are excessively tall, and even with the transoms, the doors appear much taller than they need to be.

While it's not unusual for a brick industrial building to have larger windows, they're not typically going to be double hung windows.  You'd be more likely to find large steel framed fixed windows, perhaps with a smaller section that's hinged so it can provide ventilation. This would be a more typical arrangement, shot in Columbia, Pa:


These are clearly double hung windows, but they measure approximately 3 feet wide by 6 feet tall, compared to the Walthers' windows, which tip the scales at a whopping four feet wide by 9 feet high.  Now, back in the day, I worked in a huge loft industrial building in Baltimore, which sported large banks of 4' x 8' double hung windows, three windows across.

The Candler Building in Baltimore

... But there were a LOT of them...and the building was HUGE and constructed in poured concrete with a "curtain wall" exterior, in other words, the outside wall isn't a load bearing wall (other than bearing its own weight).  The design used by Walthers', as well as by DPM, features individual windows with large expanses of brick and pilasters, which is more indicative of a load bearing wall, where the exterior wall is carrying the weight of the floor systems, roof system plus whatever's sitting on them.  From an engineering standpoint, this type of architecture is limited in how high it can be built, so I always gasp when I see model building stacked to 15 or 20 stories, because it just doesn't look right.

The dimensions between the floors of the modular kit are also a bit suspect.  While the first floor of a brick industrial structure will typically be 14 to 18' to accommodate trucks backing into the loading docks, and 20' to account for freight cars on an interior siding, the upper floors drop back to a lower height, perhaps 10 to 12 feet.  Walther's maintains the same floor heights all the way up, making the building more massive than might be realistic.  This is due to the interchangeability of the wall panels to serve as any floor's exterior.  DPM solved this problem quite simply, but it plum evades Uncle Wally.

I don't like the way the wall segments are broken down.  There are double wide sections offering dual windows on either side of a cast in brick pilaster, but no arrangements that are two stories tall.  Therefore, when you combine sections to make a two story (or more) building, you're going to have a lot of horizontal seams that you have to deal with.  (DPM provides 2-story upper walls, eliminating this problem, and the single story sections designed for your first floor feature some brick trim across the top to justify the break in the brick work.)

While the pilasters provided are cleverly designed to help lock the wall sections together, like the wall sections themselves, these parts only rise one story tall.  This leaves the modeler with even more horizontal joints in the brickwork that are a little trickier to line up and disguise than they need to be.  A trim set providing two story pilasters would allow for faster assembly, and also would strengthen the overall construction by spanning the joints in the walls.

I'm not crazy about the two cornices that are offered, either.  The peaked one just doesn't look right to my eye, and ends up creating a building that screams out "I built this with the Walthers' Modular System" more than it says, "Yeah, that's a plausible big industry".  I also don't like the angled brickwork that runs up the gables.  I'm sure this condition exists somewhere in nature, but I feel like a stepped parapet, or some other "false front" treatment would be more generic when it comes to masking a pitched roof.  The straight sections are nice, but there aren't enough of them in the kit if you're going for a large building, especially one that's not a background flat.  Same goes for the single story pilasters.  I used the system to build a flat behind my station, and came up two pilasters short.  DPM gives you an abundance of joinery in their offering, which again adds flexibility in terms of how you "cut up" your facades.

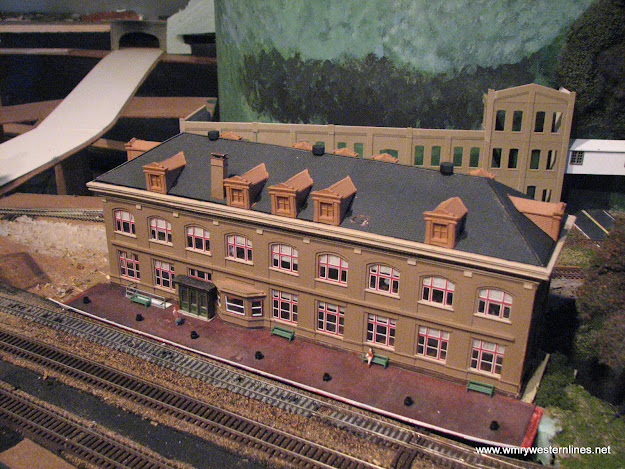
The unpainted structure behind the Cumberland Station is (obviously) whipped up from Walthers' Modulars.

The big killer, though, is the loading doors.  Since the architecture featured has the appearance of an early to mid 20th century building, you'd expect the doors to be logically spaced to receive 40' boxcars.  No dice.  If you put the loading doors, which are single wall sections, side by side, they're way too close together, and if you hop scotch them with brick blanks, they're too far apart.  They're too far apart for 50 footers, too, so pretty much anything you roll up to the loading docks is going to have to be uncoupled and spotted at the doors.  Not too big an inconvenience, I suppose, just one more thing on the stack of other small things that I regard as shortcomings of this system.

Now, just to prove that I can be a little bit fair minded, I'll say I really like the brick detail in the walls, the interlocking pilasters are a neat trick (although I'd like it better if they had some 2-story pilasters), and the system can work well for a large industrial complex, which Walthers has shown through the various industry kits they offer that utilize the system.  I also like that the system is cast in a reasonably opaque material, since I like to install interior lighting.  Although, all the joints and seams that result from the assembly design create a little more work when chasing down light leaks...  It should also be noted that the roof detail kit offered in this line is outstanding, with a variety of vents, tanks and equipment that really enhances the typical "top down" view most of us have when operating our trains.


I guess the biggest beef I have with the Walthers' system is that for all its various parts, it lacks the flexibility that is offered by the less extensive line provided by DPM.  With its giant windows, multiple small parts, odd door spacing and tall upper floors, you don't want to crowd too many of these together.  The parts also don't lend themselves to other types of buildings, such as offices near the factory, or structures you might find in a downtown area.  Also, lacking compatibility with other kits make the parts harder to kitbash into other configurations such as I've enjoyed doing with DPM parts.

I'm sure I can find other things to make with this system, but I'm afraid the attempt to make it too interchangeable makes it less flexible for multiple uses on a single layout.  The proportions seem to lend themselves to larger industries, but using the tiny sections to create a massive building would be time consuming and potentially maddening, and without using some additional bracing, it would end up getting wavy due to all the joints in the walls.