Friday, December 3, 2010

Making the Scene...

Been cobbling together some more scenery.

Here's some highlights:


Wills Creek, west of Cumberland. That would be US 40 there. This runs along the back edge of the layout, and will be difficult to access once I construct the main line through Cumberland, so I'm trying to tease out as complete a scene as I can before I close up the hole in the bench work.


Looking the other way. Once the scenery is closed up, the state highway department assures me that this will be a less dangerous curve...


High bridge over the Casselman River. This scene might seem confusing if you consider that the high bridge is on the Thomas Sub in West Virginia, while the low line is somewhere between Deal and Meyersdale in Pennsylvania. Ah the joys of selective compression!


Another view. The scene remains incomplete, I need to add the walkway on the near side of the bridge. The engine is a Walther's 0-8-0 into which I recently installed a decoder. It currently resides in Minnesota. I like this photo angle... More trees will do just the right trick.


Thomas, West Virginia. I've been working on the company town housing along the ridge.  I'm happy with the way the town is coming together. I'm working my way from the skyboard out to the fascia, gradually filling in the peninsula. You can see the Wills Creek scene just above the Cool Whip tub I use to mix up my Sculptamold. The big factory in the back is Kingsford Charcoal.


Detail of a "Company House" duplex, abandoned, and gradually returning to nature. That was kind of fun to do!

As you may have guessed, building out the scenery is my favorite part of the hobby. I regard tracklaying and wiring as necessary evils, but once they're done, I'm slinging mud and planting trees and other details. I'll try to keep you updated on progress as it happens. I'm going to try to finish out the Thomas scene in the next week or so, then I'll be making the push to get the business district along US 40 done. After that, I can get back to the dull stuff to get Cumberland operational.

Tuesday, November 16, 2010

The Missing Link


I looked forward to receiving my author's copy of N Scale magazine with much fervor. I had worked pretty hard to get all the shots in it together, and really hard on the cover shot... Well, David K. Smith did most of that work, but still.

When it arrived, I eagerly thumbed through to the article, and enjoyed seeing my work in print. The layout of the article wasn't quite what I had envisioned, but overall it was well done. But as I got to the final page, I noticed a critical element was missing.

You see, the article was written more or less as a time line describing the history of Casselman Crossing, a fictitious location on the WM that's featured on my layout. I started with a photo of a steam train pulling passengers, then proceeded to shots of some coal trains and fast freights in the early transition era, and on into the 1960's and early '70's. There's a picture of a Chessie engine in one of the lash-ups, which could have been captioned "There Goes the Neighborhood", then I described in the article how the line was ultimately abandoned by the Chessie System (I always preferred to call it Chessie the Knife), and the coup de gras was to be a photo that I painstakingly staged, showing the bridge as part of a hiking trail in the current era, with a CSX freight rumbling by in the background.

But somehow, it got lost in the shuffle and didn't appear in the article. So I provide it here, dear reader, as a public service.

I've got lots of work to update you on, but the hour is late, and the land of Counterpane beckons... More next time.

Saturday, September 25, 2010

Everything Old is New Again!


Back in ought one, or whenever it was that I first discovered the interwebs, I quickly recognized that there was an opportunity to learn from other model railroaders, and maybe show off a little of the stuff that I was doing. Apart from a few awkwardly run e-mail groups, the first real forum I wandered into was the Atlas board. If you've ever been there, you know it's a pretty good forum, peopled by a lot of regulars. There's a few that are kind of "out there", but there are also some really solid modelers who are quick to share their work, and advice to help even the most bumbling novice find his way to satisfaction in the hobby.

When I first got involved with the forum, I saw the photos that people were putting up, and I started thinking about how I could be a part of the fun. The first challenge was the very real problem that I didn't have a layout at the time! But I had a plan.


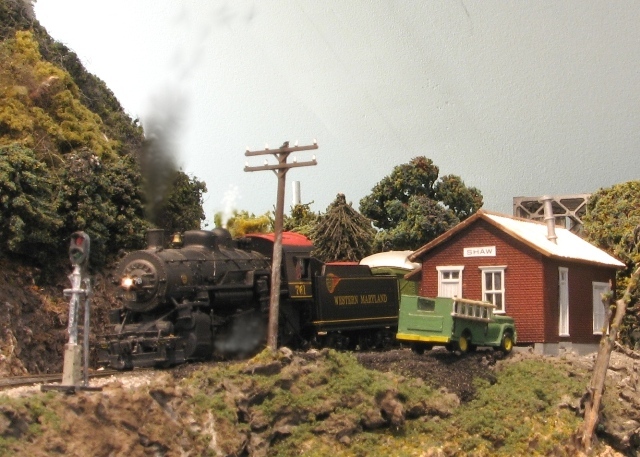
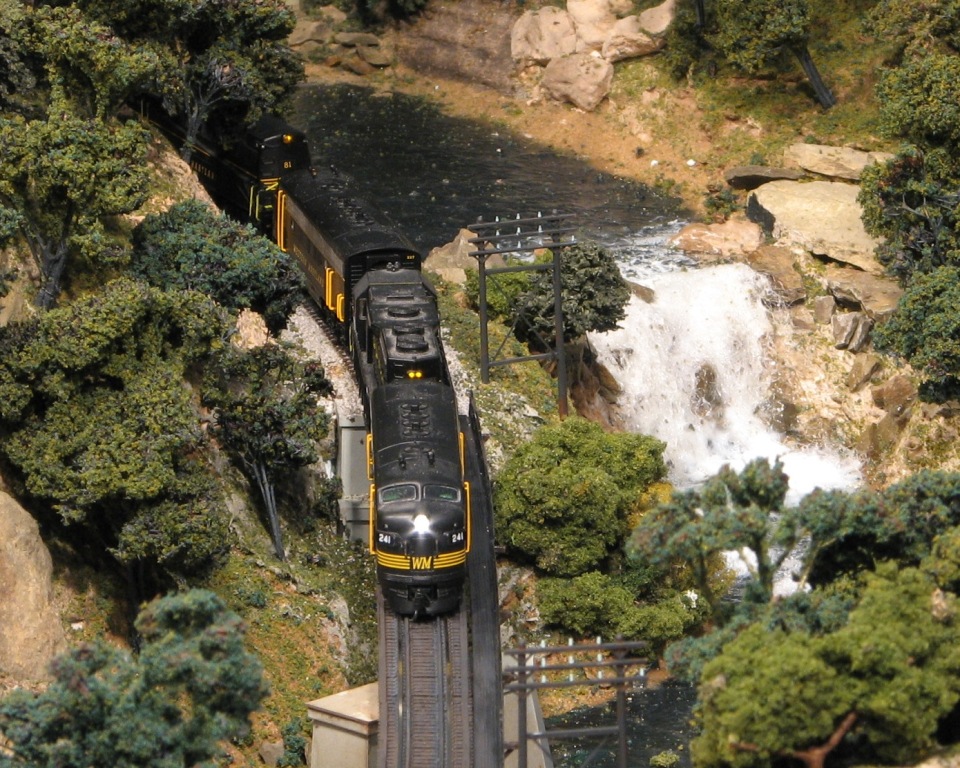
So I picked what I thought would be a good place to start, and... well, started. This piece was to be the spine of the peninsula I had planned, providing not only a nice mountain for a view block, but also a cool switch back to a coal mine, modeled loosely after the WM's Chaffee branch. This is where the Big Six operated, which was the last Shay type locomotive built in the US.

Anyway, I had gotten a digital camera for my job, so I started firing away out in the garage as this pile of foam evolved into something worthwhile. It started to attract a bit of an audience, and I really enjoyed the positive feedback I got from my fellow forumers.


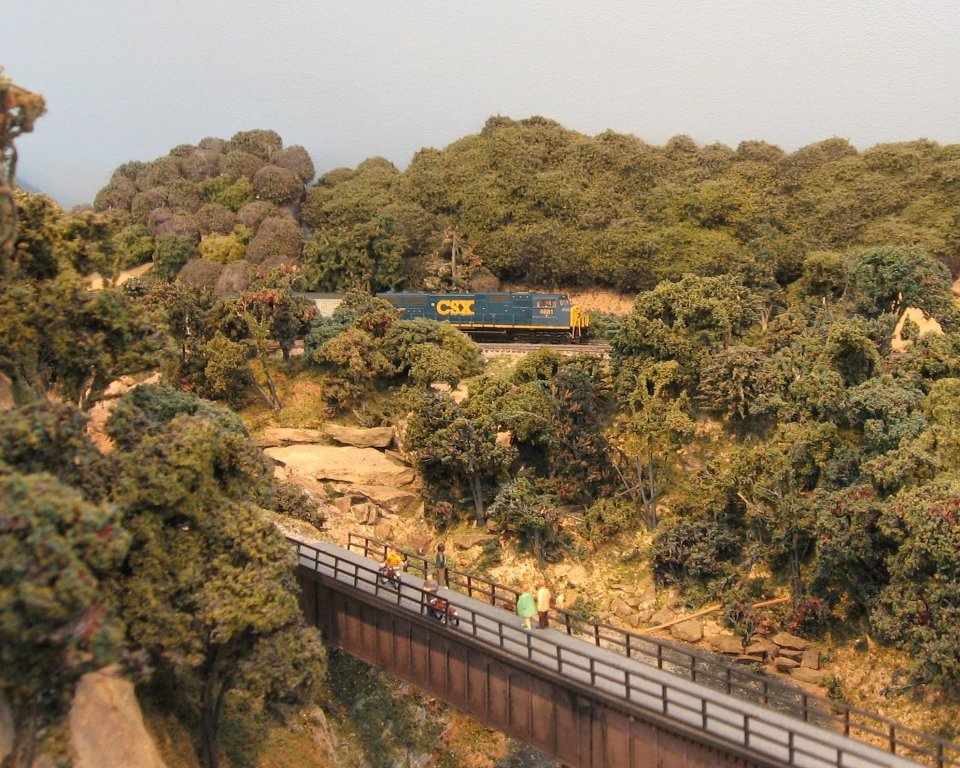
Long story short, I got the Chaffee Branch section, which was about 30" wide x 8' long, to within about 15% of completion, including ballasted track, structures, and even figures on the porch of the structures. For a long time it sat up in the attic serving as a photo background. (A big, heavy photo background!) It was enjoyable, and it was nice to get back into constructing a layout, or even just a part of one, after many years of moving around in pursuit of a career.

Finally the day came when I could get the main portion of my dream plan installed in the attic. The room was renovated, including wiring and new lighting. To make room for the new benchwork, though, I had to displace the Chaffee Branch. This was partly to keep it from getting damaged as the rest of the construction was going on, but mainly because it was just so damn big that I could no longer work around it! You may recall that once the room was renovated, I had to temporarily share the space with Andy, my son, so the room was also occupied by his menagerie of Legos, his desk and his bed. Something had to give.

So, back out to the garage it went, getting placed up above some power tools on a precarious shelf. It was high enough up that the cats couldn't get to it, and out of the way now. The idea remained to ultimately install it as part of the layout.

This was probably five years ago.

It came to pass that Andy moved into his own room, the layout got some temporary construction to allow me to at least run some trains, and finally, I started having some friends down for regular operating sessions. These sessions were very instructive as far as how screwed up my dream plan was. The staging was set up all wrong, and way too small. The yard was too small and in the wrong place... etc. etc. etc. Then there was the big one... The aisles proposed in the "Dream Plan" were way too narrow! Model Railroaders in general are not known for their athleticism. The die was cast... I had to redesign the layout; and not just a little bit.

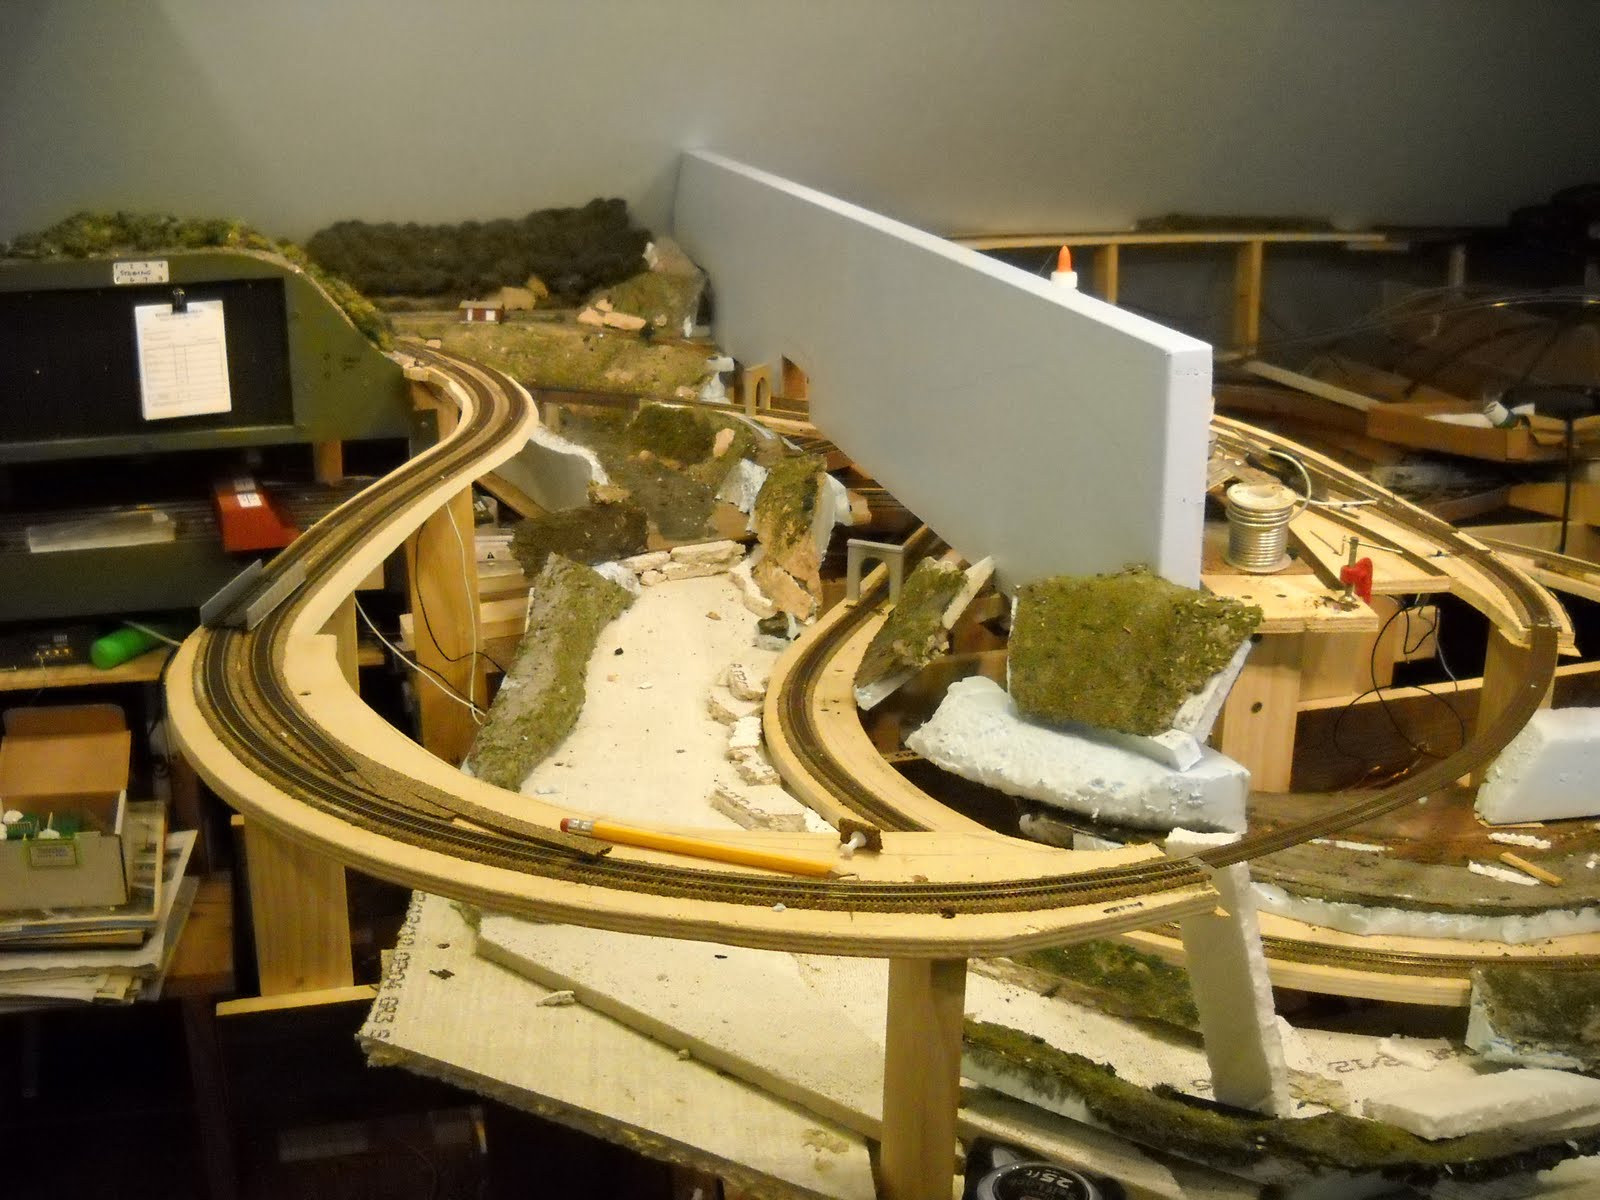
Which is why we're here now! The good news is that all the good work on the Chaffee Branch wasn't for naught. The other night, wielding an array of artillery, I cut a big chunk of mountain off, and carried the organs up to the attic for transplanting on the layout.


Part of this is due to the fact that I'm cheap. Here was some perfectly good Styrofoam, coated with perfectly good Sculptamold, and tricked out with perfectly good puffball trees! Why waste any of that!? I pulled back the canopy of puff balls, and put the old Chaffee branch cliff up against the new skyboard. I then worked some newspapers and what not into the joint between the new new work and the old new work, and made with the Sculptamold. I use a mixture tinted with craft acrylic paints, usually black and some sort of brown.


There's still a bit of blending to do, and some more "real" trees to add to the scene to really cinch it, but it looks like the rest of the Chaffee Branch will be an invaluable asset to finishing out the scenery on the peninsula that was supposed to be its home in the first place.

Friday, September 10, 2010

Just Shoot Me...

I'm pretty excited. Once again, Pam Clapp at N Scale Magazine has exhausted every possible alternative, and pulled my submitted article out of her wastebasket to run in the November/December 2010 issue. To soften the blow for her readers, she's asked me to re-shoot one of the images to use as a cover shot. This way, the readers will lower their expectations before they purchase the issue, and subscribers will have the opportunity to toss the magazine on the burn pile as soon as it arrives in the mail. (What, Me Worry?)

Anyway, just to keep things interesting, the particular composition she wants me to re-shoot is smack dab in the middle of the reconstruction project. So over the last few evenings I've scurried up to the attic after work to repair the damage and perform the necessary reconstructive surgery.

I carved foam, I smeared Sculptamold, and planted trees. Last night I re-applied gloss medium to the river and touched up the waterfall, and it's all coming together nicely. Except, of course, the whole camera situation. I'm still working with a very sub-par point n' shoot, so I'm scrambling to get some help.


So, Sunday I'm expecting a visit from David K. Smith, the multiple published author, photographer and model railroading bon vivant, who is bringing his DSLR, a bag full of smoke and mirrors, and 1,000 watts of studio lighting. All the way from New Joisey, and all of this for a chicken dinner.

Now, I'm not going to spill the beans on the content of the article, you'll have to pick a copy up when it gets published. (I'm sure you'll hear about when that happens here...) But I can assure you that the cover photo will likely raise your expectations for the article, because the honorable DKS has a reputation for making objects in your mirror appear much closer than they actually are.

Wednesday, August 11, 2010

Dog Days of Summer


Well, it's been a few weeks, hasn't it?

Temperatures around here have been in the high 90's, accompanied by that legendary Mid Atlantic humidity. Thus, my attentions have been diverted elsewhere. I've pecked away at a couple of little things on the layout, but the big leaps and bounds have come to a halt for the moment.

I am catching up on the aforementioned decoder work, and I managed to get one box out the door today after a terribly long delay (Sorry, Chris! Let me know when they get there!). Also, things are starting to pick up at my day job, and above all else, my beloved Orioles are in the midst of a 7-1 hot streak after mouldering in the cellar all summer long.

A cold beer on the patio by the radio trumps a hot attic work bench any time!

But don't worry, I've been doing a lot of thinking about the layout. I'm gradually stacking up the pennies I'll need to get the decoders and servos I want to use on the Yard. I've been sitting at the computer working out train schedules and power assignments for the Thomas Sub, and I've been planning a "Scenery Play Group" in the next couple of weeks, wherein the Crew will help me lay in the basic land forms now that the track work is more or less done on the Peninsula.

But tonight, the O's are in Cleveland, and looks to be another easy kill. (Sorry again, Chris!) So if you'll excuse me, Mr. Yuengling is calling from the patio...

Monday, July 19, 2010

Advancing on Many Fronts


Operations-wise, I've built the switching area at Thomas, including a new industry switch for Kingsford Charcoal. Kingsford wasn't actually located in Thomas, but at Parsons a few miles down the hill. But it will add some interesting rolling stock to the subdivision, having used the WM's fleet of 60' cushion framed boxcars.

There's also a home for the old Meyersdale Farmer's coop from the previous track plan, plus a team track ramp, and of course, the big coal tipple. I've got two more switch throws to install, and some wiring drops to hang from the switchback, but otherwise this section is complete and ready for paint and scenery.


In the trackwork department, I extended the western frontier of the Connellsville line, which is the two-track line that comes in at the left and then arches over the staging yard. This will eventually extend across the front wall to a helix, and thence down to the west end staging. With that bit of benchwork constructed, I could add the most visual feature of the new work to date:
...the curved skyboard that will provide the backdrop for Cumberland's urban scene, and which conceals the helix on the Thomas Sub. Naturally, after weeks of running trains up and down the helix without a problem, as soon as I installed this, I had one train suffer a derailment, and another a random uncoupling, inside the corkscrew, of course. Hopefully I won't live to regret this design compromise...

I think in both cases the problem was related to a stalling locomotive, so I sent the MOW crew up and down a few times with the track cleaning car. Hopefully that will prevent, or at least minimize, future problems.

The Bridge Department has all the materials needed to finish the High Bridge east of Thomas, I just need to take some time to sit down and build the last 80' girder span, then fabricate some bridge feet.


Electrically, I installed my first accessory decoder to run a pair of turnouts on the Thomas Sub. This is a major breakthrough for me. The decoder was certainly cheap enough, and it's an absolute delight to stand on one side of the layout and throw a switch without having to dive to a control panel on the other side of the room. There will be more of these installed, I assure you!

Things on the peninsula are really shaping up, and I expect I'll be cutting some foam and sculpting out the landscape shortly.

Thursday, July 8, 2010

Take Me to the River

Since the last time we chatted, I've made some significant headway on some basic scenic elements in the new section. I had started working on the dull stuff, wiring switch machines, mostly, when I decided (with the help of my adult ADD)to switch gears and work on something else.

Since the Casselman Crossing scene on the original layout turned out so well, my thoughts turned to the extension of the river into the new section. With the sweeping curve of the new Connellsville Line on the right, and the lofty, cliff hanging Thomas Sub high above on the left, this area promises to be a good spot for railfanning.


So off to the garage I went, in search of odds and ends to help me get started. First I needed something for the riverbed. I have a ton of plywood, homasote, and masonite out there, but for this purpose I chose a chunk of broken ceiling tile I had scavenged from somewhere. The river will step down in another falls near the new Connellsville line tunnel, so it can drop down to a level lower than that line's right of way. A little further along, and it will drop through some rapids reminiscent of the big hook in the Youghiougheny near Ohiopyle State Park in southwestern Pennsylvania.

This visual will help create a scene that will remind viewers of Ohiopyle, as the Thomas Sub will cross this gorge on a high, gently curving steel bridge at this location.


In addition to the river bed, I obtained a 12" door panel that has been pressed into service as a skyboard, which splits the new peninsula into two distinct scenes. On the left side of the view block is this river gorge. There are virtually no switching opportunities here, and it's designed to be the scenic "signature" of the railroad. On the other side, the peninsula is lousy with switching, with Thomas on the upper level with its sawmill and coal loaders, and just around the corner, Cumberland with its industrial districts. With the addition of the skyboard divider, the railroad is really beginning to take shape in this area.
I've also been steady working on the high bridge, and thanks to the contribution of a couple of Micro Engineering bridges from Daryl Kruse, we're moving right along with that project. I've been casting bridge piers from Plaster of Paris, which will allow me to really begin to get the scenery moving along in this area. All of the wiring under the river is more or less complete, which will also permit me to charge ahead with this phase of the project.

Once the bridge is completed, I can go back to that dull wiring business.

Thursday, July 1, 2010

All the way to Elkins!

All that's left now is to wire the Tortoise switch machines to operate from the Elkins panel. Using a little help from a 9v battery, I was able to stage a train from Maryland Jct. all the way into the Elkins Yard, and then reciprocate with another train headed back. Here's the evidence...


Enjoy!

Tuesday, June 29, 2010

First Train...

There's always a certain thrill you get when the benchwork is in place, the roadbed is built and the track is all laid, and it's finally time to test the track. Last night, with the aid of some alligator clips and extension wires, I was able to run a train from the siding at Maryland Junction up the Thomas Subdivision almost to the Elkins Yard.


I've got a bit more wiring to do to make the switches on the sidings functional, and then lay all the industrial tracks at Thomas, which will give me the opportunity to run trains up and down the hill with purpose!

Anyway, I thought I'd share...

Saturday, June 26, 2010

A Little Help From My Friends

Phil Hoffman and the "Coon Ass Grass Master" ready to apply some detail to the river scene.

One of the things that I really enjoy about this hobby is the opportunity I have to share it with some really great people. I'm almost hesitant to refer to the railroad up in the attic as "my" layout, because so many people have had a hand in it. David K. Smith was kind enough to use his many talents to create the track plan based on a few sketchy notes that I provided him. Brian Fons and Jerry Britton both decided that my effort was worthy of a couple of sizable contributions of track and turnouts.

When I throw out a request for some oddball bit or piece, there always seems to be someone out there who's willing to help me out, either with an outright gift, or with a significant discount to help me over the hump. Anything from a $2 electrical connector to a loaner $2000 camera has been offered, and gratefully accepted.

Then there's the consultants... Ed Kapuscinski, Dave Foxx, John Berger, Steve Hanlon, and many others have all offered advice and suggestions that will help the layout look more realistic, operate more smoothly, and just generally be better.

As the reconstruction has progressed, it's the worker bees who have really kicked it into high gear, and helped me to really start bringing the project to life. Back in February, Phil Hoffman and Dave Foxx braved one of our notorious snow storms (a light dusting was predicted) to help get the west end staging yard built and installed.

And today, Dave, Brian Carhart, Tim Alder and Gary Hinshaw braved beach traffic and tropical heat to help me make a big push on building the lines that will one day let the Western Maryland Railway hustle those black diamonds and Alpha Jets around my attic. (Phil would have been here, too, but he's an oceanographer, and a Louisiana native, so he's been called down to deal with the big BP oil mess).

Not only do these guys take time away from their families and their own trains, they drive up to two hours to get here, they bring along tools, materials and even a few beers, and they do an absolutely fantastic job. (I'm proud to say that part of my installation was performed by a NASA engineer!) Then, if that weren't enough, they even take me out for lunch.

There are guys out there that declare themselves "Lone Wolf" model railroaders. To me, that's too bad. They're missing out on some really good times building, detailing and running their railroads with other guys who share their interest.

I'm glad to know that my enjoyment of the hobby is infectious enough to attract the caliber of people I've come to know as a result, and I'm especially looking forward to returning a LOT of favors!

Wednesday, June 23, 2010

Phase 2 Begins

Last night I re-wired the staging yard to account for the reverse loop. I still have to add a few drops, and the eastbound throat needs rebuilt, but we're not too far away from having the staging tuned up and ready to be buried. I test drove a 4 axle, then a 6 axle, then the big 4-8-4, and so far so good. The only problems that turned up were in the old section that I already knew about.

Next, this morning I rebuilt the area around Shaw. This is where the original section of the layout joined the temporary section, and the benchwork was a scabbed together mess. I needed to change the elevation, since the grade would be ascending here now, instead of descending as the temp loop had it. I also wanted to replace the subroadbed with proper 1/2" plywood, instead of the 1/4" paneling/3/4" foam sandwich I used originally. Here's what it was:
You can see pretty clearly that the engine is headed down grade. The point where the locomotive is in that picture is now about a full inch and a quarter higher than it was.


You can also see that I've made provision to add a Tortoise to run the siding at Shaw. There will be two short passing tracks on the Thomas sub, on either side of the scenic divider. Probably long enough to handle about 15 cars, or 20 55-T hoppers. I'm going to put the controls for both at the end of the peninsula so one tower operator can control movements on both sides. The switch into the truck dump at Shaw will remain manually operated by the train crew.


This shot reveals that the alignment will remain the same through the junction, just at a higher elevation.


The grade change has put the truss bridge at just about level. Compare this to the old view:

The bridge originally dropped about 3/8" from left to right, which was to accommodate the original track plan. I grew weary of having to adjust photos to compensate for the stiff grade, and I'm glad to be rid of it. Now I just have to build up the center pier, which now will have room for proper bridge feet.


Here's the track to the Shaw truck dump. I think I'm going to re-purpose this siding as a sand load out. There was a source for silica sand near Shaw that was shipped to PPG in Cumberland in two-bay covered hoppers... I sure have a lot of them, and this will put them to good use. I'll carefully relocate the truck dump over to Thomas on the other side of the peninsula. You can see in the picture that I filled the void left by the grade change with some HO scale ballast I have laying around. I use this a lot for filler. I just dump it through the track, brush it out so it's all below the ties, then apply my glue soup to it. Once it sets up, I go back over it with N scale ballast and scenic materials, and when it's done, it'll be nice and blended in.

I'll have to get some of those clip strips for the Tortoise here, because it's located smack dab over the staging yard, and there's no way I'll be able to wire it from underneath. This will also be the first pairing of machines that will get the decoder experiment. I'd also like to apply some simple signaling here. (open-green, closed red) probably as fascia indicators since the Thomas Sub was TO/TT territory. A working TO signal would be fun to have at Shaw, too, and this is where the lighted TO stand from Williamsport Jct. will likely end up.

I'm trying to get all the connection elevations set so when the crew comes down for a work day all the math is already done.

Sunday, June 20, 2010

Success!

My clean up effort was delayed until after dinner due to another project (for pay) that I had been procrastinating... but that got far enough along that I could grab the broom and dust pan and trudge up to tackle the Blob.
After about two hours of sorting, sifting and sweeping, I finally got to the point where I could turn around in the room without knocking anything over. Behold! The Floor exists! There's still a few piles of junk to go through, but they are now the exception rather than the rule. At least in the train room... The Blob lives on in the workshop area now...


Oh well... it may be on the move, but at least it's getting smaller. I figure in an evening's time, I can get all this crap sorted and either put away, or bundled off for the dust man. Either way, I can start plotting the next push on the benchwork now, and yes, sleep a little more peacefully!

Saturday, June 19, 2010

Panic! Finding a Way Out of Gridlock.


I spent a lovely, relaxing day on the Choptank River today, enjoying the company (and the boat) of a couple in our neighborhood who invited us out for a pre-Father's Day junket. The weather was perfect, the river calm, and the beer was cold. The best part was laying on the bench up in the boat's flying bridge and reading "Beautiful Swimmers" and drifting in an out of a breezy nap while the kids played in the water.

When I got home this evening, my thoughts turned once again to the action up in the train room. I opened the door, and was suddenly overcome with a sense of dread. The room is a disaster area. The bones of the old layout sections are everywhere, furniture is at all angles, and the floor looks like a hobby store walked into a hardware store, then blew itself up.

The re-construction project itself is moving along at a decent clip, and I even took the time to add the guard rails to the staging yard. Then I stepped back (not very far for fear of tripping on an extension cord or a pile of shipping peanuts), and pondered what the next move should be.

There's the helix on the Thomas Sub that needs to be A) connected to the rest of the layout, B) outfitted with some fiberglass screening to prevent cars from falling to the floor should something bad happen, or C) be enclosed in a masonite back drop, which would by necessity include a curved hatch that would allow easy access to reach the cars that are safely cradled in the screen safety net, again, should something bad happen in the twist.

Too complex a project to take on in my present state of mind. So that won't do. How about building the skyboard that will divide the peninsula? Well, I should finish building the peninsula first. So strike that.

There's a couple of wiring projects I could tackle. The big one will be to rewire the back half of the staging yard, which is now part of a big reverse loop, and therefore creates a dead short. This won't be too hard to do, but it will require crawling around under the layout, and I'm not wired for that just now...


As I stepped over a stack of old magazines that appeared out of nowhere, it dawned on me. Before I turn another screw, or cut another board, I have to clean the room up. I at least have to get it into some semblance of order. The chaos all around me is causing my whole thinking about the layout to be chaotic. So, there it is. That's my plan.

Tomorrow when I get home from church, I'm going to head up there and put the shoulder to the wheel. Last weekend Andy and I were able to wrestle his room from the grip of the junk monster, so now I have to do the same thing for myself. Otherwise I'll keep looking at the mountain in front of me, instead of building it!

Track!

Well, it's after 1 a.m. here in the east, and I'm just now emerging from the lab. We're supposed to go on a boat ride with the neighbors tomorrow, so I wanted to get some headway in before taking a nice break. I think my wife is actually looking forward to seeing me!

Anyway, here's tonight's... ahem... this morning's update:

I splurged and bought myself some cork and track so I could work on the staging loop. And work on the loop I did...


It turned out that between the new track I bought and the flex that I stripped from the
old yard, I had enough to close three of the loops! I need about 3 more pieces to finish the fourth. The hardest part was tying into the old staging tracks, because the connection is smack dab under the riverbed, and there's only about 3" clearance at that point. But thanks to some bent needle nose pliers, some yellow construction glue and a cleverly concocted clamp, all went smoothly.


That's right. A half-filled water bottle. What I did was schmear a bit of yellow glue on the cork, then carefully positioned the new piece of track, sliding the rail joiners into place with the pliers. Once I was confident I had it aligned properly, I'd roll the water bottle into place, wedging it between the track and the 1x2 joist that holds the river bed. Once the glue was set, I'd roll it out and do the next piece of track. This took quite a while to do all 8 tracks by this method... Once all the tracks were poking out into the open, I started making the alignments needed to get around the big bend.

Of course, the resultant triangle where the balloon comes together just begs for a little something...


I call this "The Loneliest Job on the Railroad"...

Well, the sheer magnitude of the accomplishment wasn't enough to satisfy me for the night, so I pulled out a box of loose freight cars to check the capacity of this new facility... I'm amazed at what we can now get away with...

The outer loop is long enough now to hold two 25 car trains. That's right. I've gone from barely being able to hold one train with 15 cars, to now being able to not only run longer trains, but more of them.


The picture actually shows two trains of 30 cars each, but this doesn't leave enough room for the three diesels each that would be required to lug the damn things up the twist to North Jct. But now you see why it was so important to fix that grade on the drop bridge! The best part is that the second train into the loop will have a visual cue when to stop to stay in the clear of the train ahead of it. I can make a cut out in the fascia right where the balloon reaches its widest point, and the engines of a 25 car train would need to stop when they appear in that window. Likewise, I'll put a lamp below decks so the operator can peek in and verify that the track ahead is clear, and if it is, he can proceed until he sees either his engines reach the overpass of the twist, or until his caboose is in the location shown in the photo above.


Ideally, I'd install some real detection, but given the continuing financial drama around my house, I'm glad to know that by dumb luck or design, I don't have to right away.


Oh, and for good measure, I pulled out a bunch of coal hoppers, too... Track three can handle two 25 car trains of 70 tonners with three diesels each with plenty of elbow room. With all this capacity, I can now dedicate two tracks to Lurgan trains, and two tracks to Baltimore trains. (Before I had a maximum of 4 tracks at about 16 cars to deal with all of it, because the West end had to stage in here, too.)

I figure the middle track can serve as the run through track, and during ops sessions, can be the destination of the Union Bridge local, which can now be a more realistic 20 car train with coal and cement hoppers, plus some covered hoppers and boxes for the other switches along the way.

So, now I have to re-wire the whole yard down there, because I just created a big old reverse loop. I have a circuit board to make it work, and I think what I'll do is make the outbound lead up the helix into the reversing section.

Next, I'm building the frame for the skyboard that will divide the peninsula.

See ya next time, same bat time, same bat channel...

Lee

Friday, June 18, 2010

Coming together...


I got to work on the layout some more last night, adding the sub roadbed for the staging yard, and installing the small helix to help the Thomas Sub reach the Elkins yard up on the top level (50").

Once I get the track laid in the staging yard, (and wired and tested...) I can start covering that area up. I've left ample access from below, so hopefully any "operator errors" will be able to be cleared from underneath.

The helix, well, that's another story. It's fairly tight, 24" x 30" at it's widest point, so it's a steep climb. I've already tested it, and a couple of diesels can pull a 20 car train of empty hoppers with reasonable dispatch. My Bachmann Consolidation steamer can also make the grade. Unfortunately, my K-2 Pacific can not... The tender binds on the engine cab.

Next time I get a decoder job on a Model Power Pacific I'll give that a whirl. Maybe there's another kitbash in my future.

Obviously, I won't be sending my 6-axle diesels and 89' pig flats up there... the Thomas Sub was known for coal and timber and short wheelbase engines grinding up steep, twisting rails. So even though it barely fits, the helix still fits. I'm hoping it adds to the operating interest of that part of the railroad. To make sure it doesn't detract from it, I'm working out a safety net made from fiberglass screening to make sure that any derailments in there don't ended up dropping 4' to the floor.

Thursday, June 17, 2010

Making Progress...


Enough about philosophy. Let's get out the tools and start making some noise.

Over the past few days, I've moved the workbench out of the train room, torn down all of the temporary structure that had supported the layout up to this point, and started clearing the debris out to make room for some work to get done. Here's where we are as of this morning:

First, I raised the remaining part of the layout by 1/2". Doesn't sound like a lot, but it's made a big difference in how trains will emerge from the staging yard. It cut the grade down to half of what it was, which will help the longer trains I'm anticipating get up the hill to North Junction.

Next, I set about the business of leveling everything up, and getting started on the new bench work that will support Cumberland. I used my table saw to rip some 2x4 down into two 1x3's and one 1x2 from each. This gave me enough to make some L girders, and have enough left over to use for joists and risers later. Last night I got the basic L girder frame and legs assembled and leveled up.
I had previously built the little 24" x 30" helix, which will carry the Thomas Sub up to Elkins on the second level. It will actually be positioned about 6" to the left and about a foot higher once all the framing is in.

The next job is to add the joists and start cutting the plywood sub roadbed. I also have to build the framing to extend the peninsula another 2' from where it was previously. At that point, I can begin connecting the dots with the staging and three main line runs that will be crossing this section.

To help you visualize what I'm talking about, I've got the track plans posted. Here's the main and upper levels, and this is the lower staging level.

There's still a little bit of tweaking going on, but for all intents and purposes, this is what the railroad will look like going forward. I'm pretty excited about it.

Stay tuned for more updates.

Tuesday, June 15, 2010

It's All a Matter of Process...

Have you ever noticed that when you have it in your mind to something, usually something simple, that it quickly becomes apparent that there are a whole lot of complex, time consuming things you have to do before you can even start?

So it's been on the reconstruction of the Western Maryland Western Lines. The first phase of this project involves reconstructing the staging yard under the main part of the layout. I'm replacing a straight line thru staging yard with a 4 track "balloon" yard, which will allow trains to be turned back on themselves to return to the layout going back the same way they left.

Trouble is, this part of the layout is partially buried under a scenic section that is not being changed...

The other trouble is, the area where the balloon track will fold back hasn't been built yet, and in fact, until last night, the space was occupied by my work bench. So, before I could work on the yard area, I had to move the work bench.

So.... Before I could move the workbench, I had to clear it off. Which meant going through the rubble one piece... one tiny N scale coupler spring... at a time. You see, when you're a model railroader, you don't just sweep the debris into the trash can. There might be a cast-pewter air horn that's less than an 1/8th of an inch long, or a little slip of brass that you'll need for an electrical pick up in there with the sawdust and cat hair.

Well, after 4 hours of that kind of fun, I was finally ready. Andy came in, and we manhandled the 8' x 2' piece of old kitchen counter that serves as my workbench, into the next room. (This area of the attic had been Andy's bedroom, so we had another whole day of moving all his junk around to make room for the workbench! I tell ya, Everything is a process...!

The good news is that now I have the opportunity to go through my accumulation of modeling supplies and get it a little more organized, and once that's done, I've got a nice big empty space next to what's left of the layout to begin building the new bench for the new and improved track plan.

I've found the key to success is to boil down the project to the one piece where it's logical to start (there's usually only one of those) then peel everything else back until you can get that accomplished. Don't be afraid to tear down what will be in the way. If it's in the way in the beginning, it will slow you down the whole way. If there's track (which ain't cheap), take your time and carefully salvage it, but once that's gone, it's just a matter of backing out screws and piling up the materials. Don't worry about messing something up that you wanted to keep... you can always go back and touch up.

The other hint I can give you is find a way to make a little progress every day. Even if you just go in and move one piece of debris from where it is to where it belongs. Make a little progress.

Right now, I'm taking time to go through my parts boxes and getting them organized. My workbench is typically notoriously messy, so this is a good opportunity to catch up on some old goals. As such, time to push back from the keyboard, and get back to the process...

Friday, June 11, 2010

Thoughts on Deconstruction

I confess, I'm a pack rat. I don't throw anything away that has even the tiniest chance of being re-used. This is true in my house, which is over 100 years old. My garage is chock a block with old light fixtures, plumbing parts, pieces of lumber and scraps of drywall. Any of which might become the cornerstone of some project critical to the improvement of our lives.

This is also true in my work. I'm the manager of a soon to open Habitat for Humanity ReStore. We specialize in collecting donated building materials and home improvement wares that are cast aside by builders, retailers and homeowners, then tidying them up and re-selling them at a discount to raise money to build houses. This is a great job to have if you're a scavenger like me.

And of course, the reason you're here, this is a key component of my life as a model railroader. Last night I began the process of "deconstructing" a large part of my layout. Naturally, this meant getting reacquainted with some old friends.

Like the plywood curves that I originally cut in 1989 for my original Laurel Valley layout. And the old phone jack that once connected a lift out section to the main electrical system of my mid-90's vintage work. There's the cat-5 cable that I purloined from my old office, and the dozens of drywall screws that I've driven in, then out again, over the course of four or five different layouts.

The grand daddy of them all, though, is the hunk of Homasote that has been a part of different layouts I've built dating back to the early 1980's. Underneath the current tangle of switches and rail, ballast and ground foam, are shadows of numerous previous track plans. Today it's down to a roughly 18" triangle that supported the Williamsport Jct. area. It started out as a 4' x 7' panel, which was itself salvaged from a previous life as an office partition. When I was in high school, I worked in the Candler Building in Baltimore, which at the time was a big loft industrial building. It housed large commercial printers, a men's clothier's sewing plant, and a variety of other warehouse and office functions. My job was to help clear old tenants' stuff out of the way to provide a clear space for new tenants. As my colleagues tore into the floors and work stations with their crowbars, there I was with a Phillips head screw driver and a small pry bar, carefully dismantling this partition, eager to lay it out flat and start planning a model railroad.

My plan was to hang it on the wall in the garage, so it could be folded up and out of the way should the Old Man ever decide that the LeSabre should spend the night indoors. I don't have any record of the track plan, but I remember it being pretty cool, and set up for a modest amount of operations. The 4' wide thing ended up being its demise, since there was an important crossover that I just couldn't reach. Well, that and I went away to college.

Before I left, I cut the Homasote into 2'x 4' panels, with one 1'x4' piece left over. My plan was to build a modular, or rather, sectional layout in my room. Lots of sketches exist, but nothing ever came of them. I did take one of the 2'x4' pieces and whipped up a fun little Christmas garden after I got married. I held on to the other pieces, of course. When we finally moved into our first proper house, I had a spare room to work with, so I erected a tidy little layout that used the Christmas garden as the basis of it, then I used the other pieces to add a branch line and a small yard. That didn't last long, though, as it was determined that Daughter #2, newly arrived in 1991, would require the train room to be "re-purposed."

A few years later, we moved into a house with a proper basement, which turned into a bonanza! There was a family room and laundry room, so I commandeered the wall that separated the two. I built my detailed city scape and yards in the laundry room, which could be closed off to the little urchlings my wife tended to in her daycare. On the family room side, a dramatic scene of the Allegheny Mountains was planned, and partially executed. In the end, the house (which was rented) was sold out from under us, and again, the now ever smaller bits of Homasote were pulled up and packed into a box.

Parts of this old reliable panel were included in the Western Maryland Ry. Historical Society's N scale layout that I worked on back in the late 80's as well. Some of it ended up in at least one friend's layout. I used one piece as a base for a school science project, another shimmed up the leg of a wobbly table. It has served long and well.

I'm sure I'll have a place for it in this new plan somewhere, even if it's just a block to hold up a tunnel portal.

Thursday, June 10, 2010

And So It Begins...


At 10:54 p.m. EDT, Western Maryland Extra train #25 left Maryland Jct. pulling a train of four gondolas and two flat cars toward Williamsport Junction. The work crew aboard has dismantled the hardware from the track, including switch machines, signal stands, and the train order stand at Williamsport. The train circled back around, pulling hardware along the Thomas Sub between Williamsport Jct. and Shaw, then proceeded back to Maryland Jct., and onto the Connellsville sub, dismantling hardware from the mouth of Knobley Tunnel through Meyersdale to Casselman Crossing. The diverging route from Williamsport Jct. to Ridgeley Yard has been embargoed for about 6 months, since Ridgeley Yard was closed for major upgrades to improve traffic flow. This track will also be removed in favor of a superior alignment, according to WM's engineering department.


The forests in these areas have been leveled, and only a few abandoned buildings remain along the right of way. Tomorrow track gangs will be deployed to salvage rail and ties along both of these same lines. Once these lines are cleared, there will be substantial earth moving activities underway, as phase 1 of the Western Maryland's improvement program gets underway. This will involve deconstructing much of the peninsula area to gain access to the original staging yard, approximately 200 yards below the surface of the earth. The yard will be reconfigured to allow trains to smoothly loop around to return to North Junction. This activity will also significantly improve the capacity of the railroad, creating four through tracks that can accommodate trains of up to 40 cars. At present, trains are restricted to less than 20 car lengths.

This project will also include replacing the current eastbound yard throat in staging. It is currently laid out with #6 Peco turnouts, which have proven to be too sharp and unreliable, and will be replaced with Peco #8, or long streamline switches. This will improve safety for the WM's crews, and reduce transit times to and from points along the east coast.

Once completed, work will begin on the new alignment of the Connellsville Subdivision from Casselman Crossing westward to Connellsville. The railroad regrets that in the process of this work, the communities of Williamsport Jct. and Meyersdale will forthwith be wiped from the face of the earth, however, new development opportunities will exist once the Queen City of the Potomac, Cumberland, Maryland, is installed sometime in the near future. Until further notice, shippers located west of Maryland Jct. will be served by local trucks. We apologize for this dreadful inconvenience.


Stay tuned for further developments as they happen!

Friday, May 14, 2010

The Potomac Project

No, this isn't some CIA mission to secure the nation's capital, it's my attempt to create the illusion of a WM Potomac 4-8-4 using a Bachmann Northern as the basis for a kitbash. I've got a million projects started in the train room, so I thought it would be a good time to start another one! I got a great deal on the engine from a guy over on Scale Rails Online that got it in a train set, but found it to be too big for his little layout. This is a reprise of a project I built for the WMRHS layout about 25 years ago, but the locomotive of course was a terrible runner, and I only did some modest cosmetics on the front end. I must have done something right, though, because someone thought enough of it to steal it.

Here's the beast we're going to try to create.


And here's the model we're starting with:


It's the newest version with the smoother drive and blackened hardware. The shell, on the other hand, is the same old same old that's been produced since the late 60's, replete with cast on everything, and a rectangular boiler profile below the belt line. I'm going to see how these problems might be fixed.


The first step is to lose the oil bunker. I had picked up an old Rivarossi Berkshire tender in anticipation of this project last year. I went ahead and painted the top of the tender Oxide Red, but left it there. I'll need to have some decals made to properly finish it.


I've prepped the tender to handle DCC, adding wipers to the trucks, and cutting down the frame to make room for the decoder. There looks to be room for a sound chip and a speaker, which I might add down the road.


The drive looks to be pretty easy to convert, with friction tabs being the only connection between the motor and the frame. These can be easily insulated to allow for separate connections to the decoder. I'll need to dig a trench up the spine of the frame to get the lighting wires installed, but that shouldn't be a big deal.

The other modification I made was to the drawbar on the tender. I had to cut it back a bit, and drill some new holes to bring the spacing between the engine and tender to a more realistic dimension.


I drilled two holes in the metal Rivarossi drawbar to be able to adjust the coupling distance. The shorter hole turned out to work fine with the 15" minimum main line curve on the layout, so that will be the permanent setting when I get to that point.


After drilling out the draw bar, I fabricated a new pin from a bit of sprue left over from a pack of MT 1015 couplers. I trimmed off the smaller arms, and filed the shaft smooth. It fits snugly into the hole left by the stock pin, with the drawbar resting on the tab that I left in place. Once the painting and other body work is done, I'll use a soldering pencil to melt a "rivet" on the top of the pin to secure it permanently to the engine.


Here's the engineer's side renovation plan. I want to get brass overlays etched to simulate the all-weather cab, and I'll have to rework the walk board into a single level from front to back. The ladders will also have to be modified, and I want to add new separately applied grabs down the length of the boiler. On the front of the smoke box, I'll need to relocate the headlight to the top of the box, and move the bell over to the right. The rest of the modifications will be on the pilot, similar to the 2-8-0 with the addition of a Z scale 905 coupler and a plow, plus a few other details.

The next step will be wiring in the decoder... as soon as I can get my hands on one!

See you next time.