Well, I'm happy to report, it's getting very near completion. If you've been following along at home on the Railwire, or any of the other on-line street corners I hang out on, I apologize for the repetition. But here's a brief history of the project.
First off, in 2000, I traded in all my dreams of a 1970s era Conrail layout for an Atlas Western Maryland SD35. As validation of that decision, in January of that year, Model Railroader Magazine published plans for the WM's Cumberland depot, and in N scale, no less. Immediately I began doodling a track plan that would require the services of this venerable old stack of bricks.
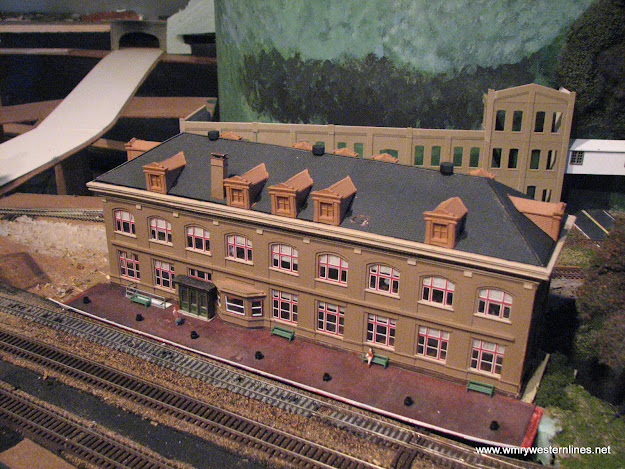
In 2003, I bravely filled a cart with brick sheet from Plastruct, and photocopied the plans several times to create cutting templates. I busily scribed and snapped out dozens of window openings, then brick pilasters, and finally, glued together a stack of Evergreen Styrene strip to piece together the distinctive cornices of the building. In addition to the MR drawings, I had a couple of old photos I had taken while in The Queen City back in 1989. A few evenings and several #11 blades later, I had come up with this:

I had the exterior walls assembled, built a dormer and a chimney, and even the nifty vestibule from the waiting room to the platform. I shot it all with a color that I thought was pretty good, then put it all aside to work on other projects on the layout.
Long story short, I went to retrieve it from the storage box I'd put it in, since I was now getting to the point where I was going to be ready to install the station on the layout. As discussed in November, the windows were a big hang up. After a couple of conversations on-line, and couple of files sent back and forth via email, the problem was solved by Rob Madson (a.k.a Lord Zox on the 'wire) who was just then tinkering with a Silhouette SD digital cutter. He created beautiful windows from cover stock, in full color, no less, and self-adhesive! It was a brilliantly simple solution to a problem that had dogged me for years.

I quickly had the exterior walls finished with the windows, then turned my attention to installing some interiors and LED lighting, which ended up taking a couple of weeks. The interiors ended up being pretty elaborate, made necessary by the large windows. The station would occupy a prominent location, highly visible from the aisle, so all that glass demanded to be fed with interior details. Using some scrap styrene vertical window blinds, I whipped up a series of partitions based on the floor plans from the MR drawings, aided by a digital copy of the building's original blueprints.

In addition to wanting to show off something through the windows, I needed to repair some pretty serious warpage that had taken place while in storage. The full wall to wall floors helped pull the walls back under control. With the interior partitions situated, I made with the soldering pencil, and started adding lighting.


 |
| There are no fewer than 25 separate pieces used to construct this dormer. Scratching them all out was out of the question. |
Resin casting seemed like a logical thing to try. I had bought a resin casting kit some years ago in anticipation of this very project. But alas, time had taken its toll on the kit, and all of the resins and mold making material had long since turned to rock. Once again, one of my colleagues on the Railwire, David K. Smith, provided the solution. I sent the master dormer I had built up to NZT Products' world headquarters, and a few days later, I received a package in the mail that contained 12 perfectly identical dormers, sloped at just the right angle to give the roof its signature appearance.


So anyway, I'm happy to report to you that I've finally finished a project!
No comments:
Post a Comment